These last 2 years I have introduced third grade social studies with a unit on geography. The second grade directs significant attention to exploring the five boroughs of New York City and ensuring that students have a solid framework of knowledge of the 50 states. In third grade, we move from identifying features of the map – compass rose, legends, grids, and scales – to applying them to map reading. As we learn to distinguish between physical, political, and thematic maps, we also embark on a study of landforms.
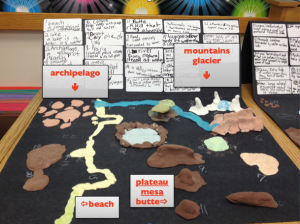
Before I became so awesome….landforms, seemed like a pretty unstimulating topic. That is until I discovered the power of Model Magic®….and when I say discovered, I mean it in the sense of Christopher Columbus ‘discovered’ the Americas. Model Magic® has probably been cool for a while, but we’re going to go with the idea that I am a genius. To create the map below, you only need to buy white Model Magic®, add some marker, blend it together, and TADA!
Lesson 1: The Introduction
In my classroom I introduce a lot of topics through PowerPoints. I try to make them as interactive as possible….in other words, I try to trick my students into thinking we’re playing a game. I have a high success rate.
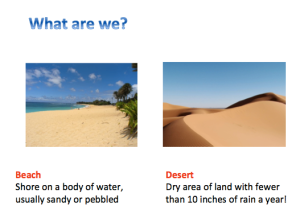
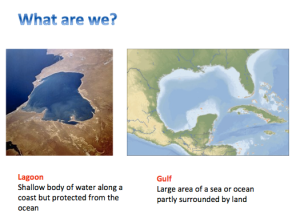
When these slides first appear, the title and definitions are hidden and I only reveal them when children hit upon the right answer (or find themselves collectively in a pickle). It’s a visual way to compare and contrast features of the landforms. It’s a guessing game and students love it.
Lesson 2: The application
Break your class into small groups (4-5). This portion of the project takes about an hour.
Give each group a List of Landforms with definitions as a reference. I like to cut this list up so that each child has a piece of paper with their 4-5 landforms. They are responsible for building these out of model magic.
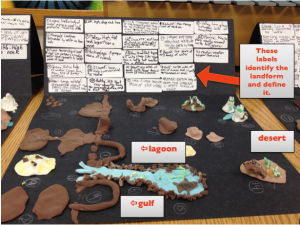
I find that a 2oz bag of white Model Magic® and a 2oz bag of earth toned Model Magic® is plenty for a class of 20-25 students to work together to create their landforms and place them on the map. I also provide printer labels so that as students finish making their landforms, they write the name and definition of it on the label. Stuck to the backdrop of the folded poster board, this serves as a map legend. Be sure to have students match numbers to the labels and the landforms.
Some quick tips:
Laying the beach down first is the most important because putting in the middle of the poster board separates the land from the “ocean.” The idea is to create a landscape. Mountains should not appear in the middle of the ocean. Islands, however, would fit in perfectly.
No comments:
Post a Comment