Tuesday, December 25, 2012

Teaching about the Native Americans: How to Start


In December, it was time to move on from geography and into the study of Native American culture and way of life at the start of our nation’s history.  I look forward to this unit every year with a mixture of delight and trepidation.  There are so many awesome opportunities for project-based learning, however, there seem to be an equal number of ways to perpetuate stereotypes.  I have tried hard to fill in the gaps of my own understanding of the earliest Americans, so that I can teach a more balanced view of the past.

I realized quickly in my first year that telling my students we would be studying the Native Americans gave them a false sense that we were studying a people who no longer existed.  So in my second year, I made to sure to begin our unit in the present.  We had just finished studying world geography, and so I asked children if they knew which countries their ancestors were originally from and why they came to the United States.  Even my 3rd graders whose grandparents and great-grandparents were born here, were able to think about how these relatives lived years ago, and how things about them changed with the times.  Wouldn’t this be similar for the Native American people? 

It was a successful conversation that helped children to think about the place the earliest Americans have in our current history.  It helped them understand that we talk about their past, because it affects all of our pasts as US citizens, but it does not mean that the Native Americans have disappeared or that they live the same way they once did hundreds of years ago. 

From doing my research online and listening to the ideas of other teachers, I went from the present to the very past.  Through PowerPoint, I spoke to my students about the land bridge, how the earliest Americans were nomads who were believed to have followed the wooly mammoth from Asia to North America and how later people perhaps came by sea down the coasts.  Here are some of the slides I used.  Guess which one was their favorite.

We talked about how our world has changed over time, how the continents have moved and how this affected the earliest people.

We talked about how if we look at today's map from a different perspective we see how close Asia and North America truly are.  We have an easier time picturing "beringia" - the land bridge.


We talked about how this land bridge melted and reformed over and over again over time, until eventually it had disappeared.


We talked about how it is believed that the earliest Americans followed their food source - the wooly mammoth.


...But not like this.


And finally, we looked at a map of North America divided by regions in which the earliest Americans settled, and made a list of natural resources the people might have had available to them depending on their location.


So how do you wrap up a lesson that is mostly discussion?!  Sometimes we don't have time for children to fill out comprehension worksheets and sometimes those sheets seem repetitive.  Still, I want to know that my students have followed along.  My tool is the "Roll and Write."  At the end of class, (though sometimes the beginning as a warm up), I ask each table to roll the die once.  Whichever number they land on is the question they must answer.  You can differentiate this day to day! Sometimes I let them work as a group and write their answer on an index card.  Other times they have to answer it individually.  Either way, it is a great way for me to quickly assess what material has really sunk in!  I have a great reward system for those who have the correct answer but I'll save that for another time. 

This is what the "Roll and Write" slide looks like.  I save for the last 5 minutes of class,
or open with it to review a previous lesson.  


- - - - - - - - - - - - - - - - - - - - - - - -

This year I was also able to introduce the unit with a visit from the Redhawk Native American Arts Council’s performing artists.  If you are in the New York area this organization has a wonderful program for children of all ages.  The dance troupe visited our school and spoke about the stereotypes we often have about Native Americans, while getting our students out of their seats for some interactive dances.  Visit http://redhawkcouncil.org/ for more.  


Monday, December 17, 2012

Nations Notebook: World Geography Unit

My own geography teacher was an impressive figure.  He had us select and research 3 countries and turn in a bound report after months of work.  Although I was significantly older at the time than my current students, I knew I had to find a way to adapt his project when it came time for my own classes to apply their knowledge of map features. 

My 3rd graders and I reviewed US maps for weeks, building upon skills taught in 2nd grade.  As I moved into features of the world map, I used Nations Notebook as an opportunity for students to apply their knowledge, acquire research skills and broaden their appreciation of other cultures and countries. 

Length: 45 minutes    Unit Length: 2 classes per week/4 weeks

All the student guides are here.  Take, tweak, share at will and let me know how it goes! For more detail on how I conducted the project, read below. 

Lesson 1:
To begin, I taught my students about the 7 continents, the equator, the prime meridian, the hemispheres, and the oceans.  We talked about how borders can change, taking Sudan and Southern Sudan as a current example.  In our previous study of US geography we had discussed the difference between political maps, physical maps, and thematic maps, and now we looked at how these categories apply to world maps as well. 

Lesson 2:
I wasn’t surprised by how little the children knew of world geography…learning the 50 states is tricky enough!  So the point of Nations Notebook wasn’t to memorize facts or locations, but to give students a way to apply their new map knowledge.  In lesson 2, I paired students up and laid out large maps of 6 continents (Antarctica not included).  With their partner, they chose a country based on their own criteria.  Some chose countries they, or a relative, had been to, or one they had heard about on the news.  Others closed their eyes and accepted the choice of a random finger landing. 

In the end 40 different countries were chosen across the 3rd grade, from Ecuador, to England, to Papua New Guinea. I think it is important to have children reflect on their prior knowledge and actively think of the questions they have before going into their research.  I used the Pre-Research Interview PDF here to get students excited 


Lesson 3 and On:
I am a firm believer in inquiry-based learning and allowing children to formulate their own questions to guide their research.  I will be the first to admit that this project was considerably more structured.  At my previous school, my students were accustomed to inquiry-based assignments and felt comfortable with wonder walls and exploration.  My current kiddos, on the other hand are used to rigor, but grow agitated at the thought of being left to their own devices.  As this was our first research experience of the year, I chose to ease in slowly by making guided question packets for each group to use with different resources.

The first resource was a world map.  Students were able to use our class set of world map placemats to figure out their chosen country’s continent, hemisphere, neighbors, and/or bordering oceans. 

The second resource was the National Geographic Kids World Atlas. We were fortunate to have a class set in the library, but you can explore it online at this site.  Using the atlas was important.  We talked about features of non-fiction books and learned interesting facts about the geographic regions where our countries were located. 

Our third, and most important resource, was www.culturegrams.com.  I cannot speak highly enough about this database.  If your school is willing to purchase an account it is an excellent tool for any teacher.  Students were able to use the kids edition to explore different aspects of their country; its economy, government, landscape, climate, population, languages, schools, foods, and even hear about daily life from actual interviews. 

Final Project:
When I began Nations Notebook, I imagined that each partnership would present their findings through a poster.  I anticipated needing two class periods in which students could paraphrase and transfer facts onto index cards and add their visuals.  However, school was canceled after Hurricane Sandy hit, and in that time I was fortunate enough to attend a Teach21 workshop on Project-Based Learning.  One of the ideas I took away was the concept of creating a menu of options.  Try this book for more ideas: Differentiating with Menus.  Instead of limiting my students to a poster, I made it one of six options.  See the others here: Nations Notebook Menus PDF
I was amazed by how my students responded to the choice!  Suddenly groups were asking to stay indoors for recess to construct hanging mobiles, or take their project folders home to write their interview questions.  My class came alive and it was an absolute pleasure to observe.  The projects are displayed in the hallway and I set aside class-time to listen to each group present.

While Nations Notebook took longer than I initially anticipated, in the end my students acquired research skills, practiced their public speaking, put together an informative project that reflected their interest and creativity, learned about other countries and cultures in a meaningful way, and most importantly, applied their map skills.  It was a success and I cannot wait to repeat it!


Brochure for Belgium

Postcards from Sudan

An Interview with the President of South Korea

Mobiles for Australia, Chad, Thailand and Ethiopia

Namibia Poster

Brazil and Greece Posters

Columbia Poster


Wednesday, December 5, 2012

Creating a Landform Map


These last 2 years I have introduced third grade social studies with a unit on geography.  The second grade directs significant attention to exploring the five boroughs of New York City and ensuring that students have a solid framework of knowledge of the 50 states.  In third grade, we move from identifying features of the map – compass rose, legends, grids, and scales – to applying them to map reading.  As we learn to distinguish between physical, political, and thematic maps, we also embark on a study of landforms.
Before I became so awesome….landforms, seemed like a pretty unstimulating topic.  That is until I discovered the power of Model Magic®….and when I say discovered, I mean it in the sense of Christopher Columbus ‘discovered’ the Americas.  Model Magic® has probably been cool for a while, but we’re going to go with the idea that I am a genius.  To create the map below, you only need to buy white Model Magic®, add some marker, blend it together, and TADA!
Screen shot 2012-12-05 at 9.01.12 PM
Lesson 1: The Introduction
In my classroom I introduce a lot of topics through PowerPoints.  I try to make them as interactive as possible….in other words, I try to trick my students into thinking we’re playing a game.  I have a high success rate.
Screen shot 2012-12-05 at 8.02.02 PM Screen shot 2012-12-05 at 8.15.08 PM
When these slides first appear, the title and definitions are hidden and I only reveal them when children hit upon the right answer (or find themselves collectively in a pickle).  It’s a visual way  to compare and contrast features of the landforms.  It’s a guessing game and students love it.
Lesson 2: The application
Break your class into small groups (4-5).  This portion of the project takes about an hour.
Give each group a List of Landforms with definitions as a reference.  I like to cut this list up so that each child has a piece of paper with their 4-5 landforms. They are responsible for building these out of model magic.  
I find that a 2oz bag of white Model Magic® and a 2oz bag of earth toned Model Magic® is plenty for a class of 20-25 students to work together to create their landforms and place them on the map.  I also provide printer labels so that as students finish making their landforms, they write the name and definition of it on the label.  Stuck to the backdrop of the folded poster board, this serves as a map legend.  Be sure to have students match numbers to the labels and the landforms.
Screen shot 2012-12-05 at 8.55.14 PM
Some quick tips: 
Laying the beach down first is the most important because putting in the middle of the poster board separates the land from the “ocean.”  The idea is to create a landscape.  Mountains should not appear in the middle of the ocean.  Islands, however, would fit in perfectly.

Monday, December 3, 2012

Voting for a 3rd Grade Mascot: An Election Curriculum


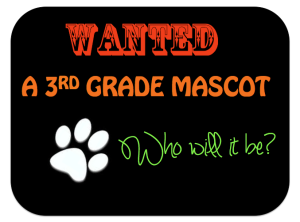
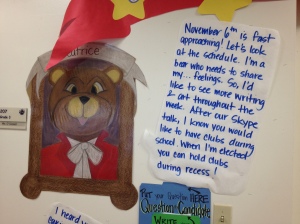
November 6th, 2012 may have come and gone, but that doesn’t mean we have to wait for 2016 to teach children about the election process.  Going into September with the knowledge that election day loomed ahead – perhaps the biggest “teachable moment” moment in a social studies teacher’s career  - I knew I had to find some curricula inspiration.   What I came up with was The 3rd Grade Mascot Election – a parallel (and slightly less-televised) election to Presidential race.

Lesson length: 45 minutes      Unit Length: 1 class per week/6 weeks

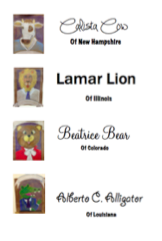
Lesson 1: I started with a PowerPoint presentation to my classes, to introduce the four candidates.  First, they were given the candidates’ superficial characteristics – favorite foods, states they hail from, hobbies – to segue into discussion on the qualities that matter in a leader.  It was interesting to hear how students initially gravitated toward one choice over the others based on a shared peanut allergy, or love of the Chicago Bulls (The candidates had some odd bios – and coming up with them was 3/4 of the fun!)  We talked about the trouble this could get us into if we were to choose the President on similar superficial issues.  As the follow-up piece in their election folders, students wrote about “What it means to be a leader.”
Wanted 3rd Grade Mascot

The Candidates
Samples of the PowerPoint

Screen shot 2012-12-02 at 4.30.20 PM
Writing prompt sample from the folders
Calista Cow
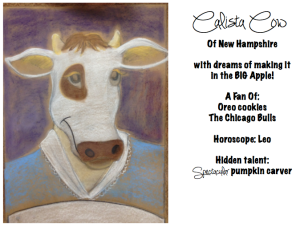
The kids meet Calista for the first time


Lesson 2-5: From here I explained that since the candidates were running to be the mascot of our grade, we needed to hear what their thoughts were on the campaign issues that mattered to us.  I hung the pictures of the candidates in the hall, with speech bubbles beside them as the vehicle for sharing their platform.  Every Monday I would change the speech bubbles to address a new issue.  For the rest of the week students could read about the candidates’ take on the new issue.  The issues that were introduced each week were:
  1. The Lunch and Snack Policy
  2. Length of Recess and Location of Recess (Our school has 2 recess locations -  the playground and the field)
  3. Academic Focus (Meaning which subjects are taught more)
  4. Homework Policy
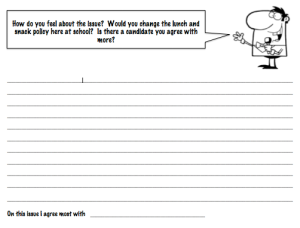
On Friday, students would come to class ready to talk about the candidates’ latest position.  We would keep track of the candidates’ platform on charts in our Election Folders.  We talked about the importance of looking at a candidate as a whole – not just focusing on one issue.  However, we also talked about how some issues are more important to us personally than other issues – and how this might affect how we feel about a candidate.  At the end of every class students had a chance to write about who they were thinking of voting for on November 6th and why.

The hallway
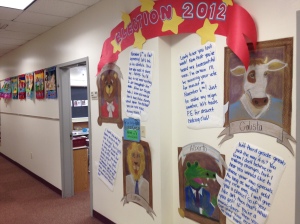
Election display in the hallway!
Lamar
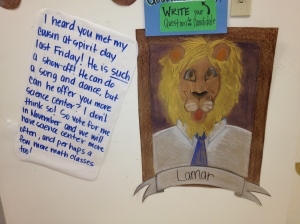
Hearing from Lamar Lion 
Chart
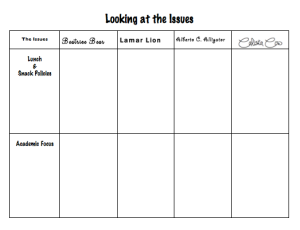
Charting the Issues: Sample follow-up
Who do you choose?
Kids have a chance to share their opinions, ask questions, and present compromises.
Talking about the candidates' platform and completing charts doesn’t take a whole period, leaving plenty of time to delve into other election projects.  One fun activity we did early on was work in table groups, coming up with changes we would like to see happen at our school.  Some of the ideas were flat out insane.  Most, however, were practical and heartfelt,and some gave new insight into what truly matters to certain kids – A nurse’s station near the recess yard, less pasta at lunch, more independent reading time during the day, a staff room for kids (I loved the misguided thinking on this one).  Students came up with the ideas as a group, but put them in different sized bubbles reflecting how important the issue was to them personally.

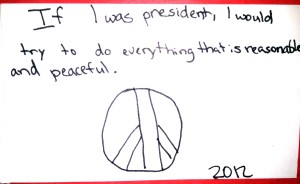
Other activities included: Making voter registration cards, Campaign posters, Reading about Barack Obama and Mitt Romney, & Sharing what we would do if were were elected President.

One of the best follow-up activities was our SKYPE date with the candidates.  Each of the 4 classes was assigned candidate, and each candidate got a skype address –  example: Beatricebear  (yes, she is indeed out there in cyberspace now).  My friend – the loveliest science teacher ever – had students come up with questions for Beatrice about her platform.  I, hiding in random school offices, put on my bear-iest voice, and answered the questions to the best of my ability.  Some were not fooled, but it was highly entertaining for all.

Interests
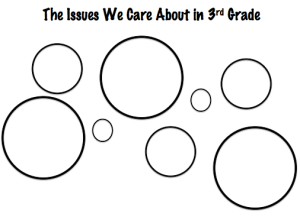
Issues that Matter Bubbles

Beatrice
Beatrice Comments on our Skype Date!

IMG_1797
If I Were President - Activity (Work in Progress)
IMG_1799
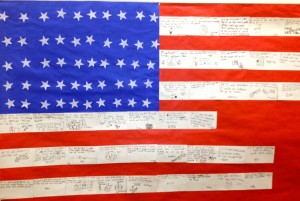
Example of an index card from the flag
Finally. November 6th arrives.  Hurricane Sandy has set us back a little and we have missed a week of school, but we are prepared.  For the past 6 weeks we have talked about our candidates and talked about the issues.  A chart with a summary of points has been hung across from the portraits of Beatrice, Lamar, Calista and Alberto.  Now it is time to vote.  Students filled out a ballot card, took an “I VOTED” pencil and went on their merry way.

The Campaign Platform
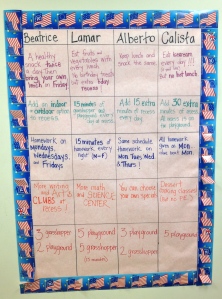
The summary of each candidates position.  This chart helped students compare their candidates' views on similar issues. 
Screen shot 2012-12-02 at 4.14.41 PM
Circle Your Mascot Choice! Ballot Cards
Voting Day
November 6th: Voting!!!
If you’re curious - Alberto C. Alligator won.  THE NEW 3RD GRADE MASCOT!  The most conservative of all the candidates, he brings little change to our, evidently, perfect school.  He did campaign to add 15 extra minutes of recess and so to celebrate we dedicated one day to enacting all of Alberto’s changes.
All in all, this unit required a considerable amount of pre-planning, but once under way it was relatively simple to keep up...and the students and parents loved it.